Activity Recording
This section is available only for editions higher than PQFORCE Smart
Workspace
The workspace features a table that visually represents employees' work activities, allowing for the logging of daily work hours and tracking of time allocation across different projects and tasks.
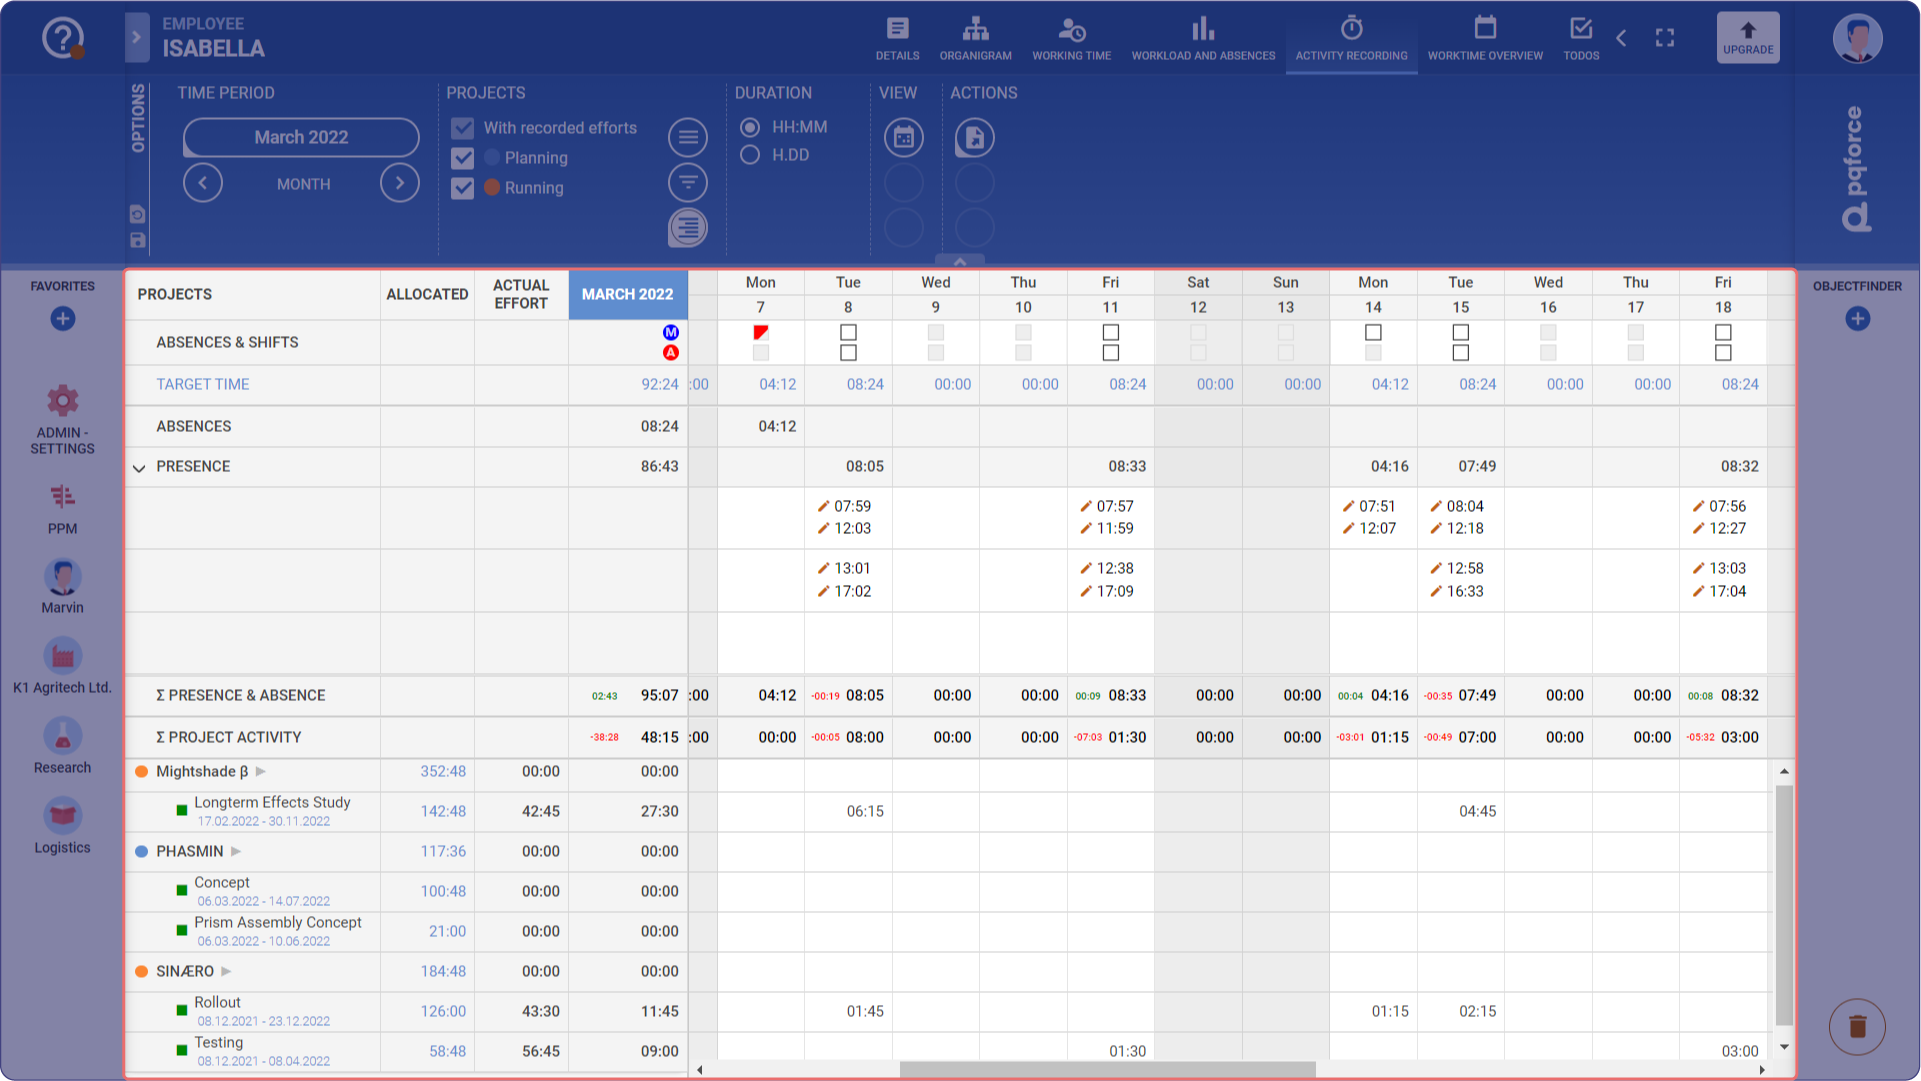
It comprises several columns and rows, each providing specific information about allocated time, actual efforts, absences, and project activities.
-
ALLOCATED: Represents the predetermined hours that an employee must dedicate to his projects over a specified period.
-
ACTUAL EFFORT: Displays the actual time spent by the employee on each assigned project or task.
-
ABSENCES AND SHIFTS:
-
Divides days into morning and afternoon shifts, allowing customization of working schedules according to individual or organizational requirements.
-
Allows to designate certain days as absences, such as holidays or sick leaves, for either one shift or the entire day.
-
-
TARGET TIME: Indicates the total hours an employee is expected to work during the indicated month, as per the company's schedule.
-
ABSENCES: Displays the number of hours an employee was absent during the month.
-
PRESENCE: Shows the number of hours an employee dedicated to work throughout the month, based on recorded hours.
-
PRESENCE AND ABSENCE: Provides insights into the hours already dedicated to work and how many working hours are remaining until the end of the month.
-
PROJECT ACTIVITY: Presents the total hours an employee has dedicated to all their projects so far.
Options Area
The following section describes in detail which settings can be made in the Options Area.

TIME PERIOD
This section allows to designate a specific time frame for visualizing activity recording.
-
The oval-shaped icon, indicating the month and year, facilitates the selection of desired temporal parameters.
-
It is possible to navigate through different months by clicking the arrow circle icons positioned on the left and right sides of the month.
VIEW
Within this segment, it is possible to personalize the visualization of the primary table in the workspace.
-
Presence and Activity Recording icon renders the main activity recording table visible.
-
Activity Recording List View presents an alternative table format, featuring columns representing days of the month and week, along with tasks assigned to the active employee and hours dedicated to each task. Comment feature can be utilized to append notes regarding ongoing tasks or projects.
-
Calendar icon triggers the appearance of a secondary workspace showcasing the workload and availability of days for the active employee.
DURATION
This section offers users two options for adjusting the format of time visualization within the table:
-
The H:MM option displays time in hours and minutes.
-
The H:DD option displays time in decimal hours.
PROJECTS
This segment encompasses three options in list view, accompanied by three circular icons:
-
With Recorded Efforts option showcases projects with documented efforts.
-
Planning option presents projects in the planning stage of their Lifecycle.
-
Running option displays projects in the running stage of their Lifecycle.
-
Show All Projects icon reveals all projects available on the platform.
-
Show Only Allocated Projects icon filters and displays only projects assigned to the active employee.
-
Show Only Allocated Projects and Tasks icon presents projects and tasks assigned to the active employee within a specified time frame.
ACTIONS
The exports icon enables users to export data in a format of their choice:
-
Spreadsheet (PDF, xlsx)
-
Timesheet
This view within PQFORCE offers two primary functionalities: registering presence and project activity recording.
Registering presence
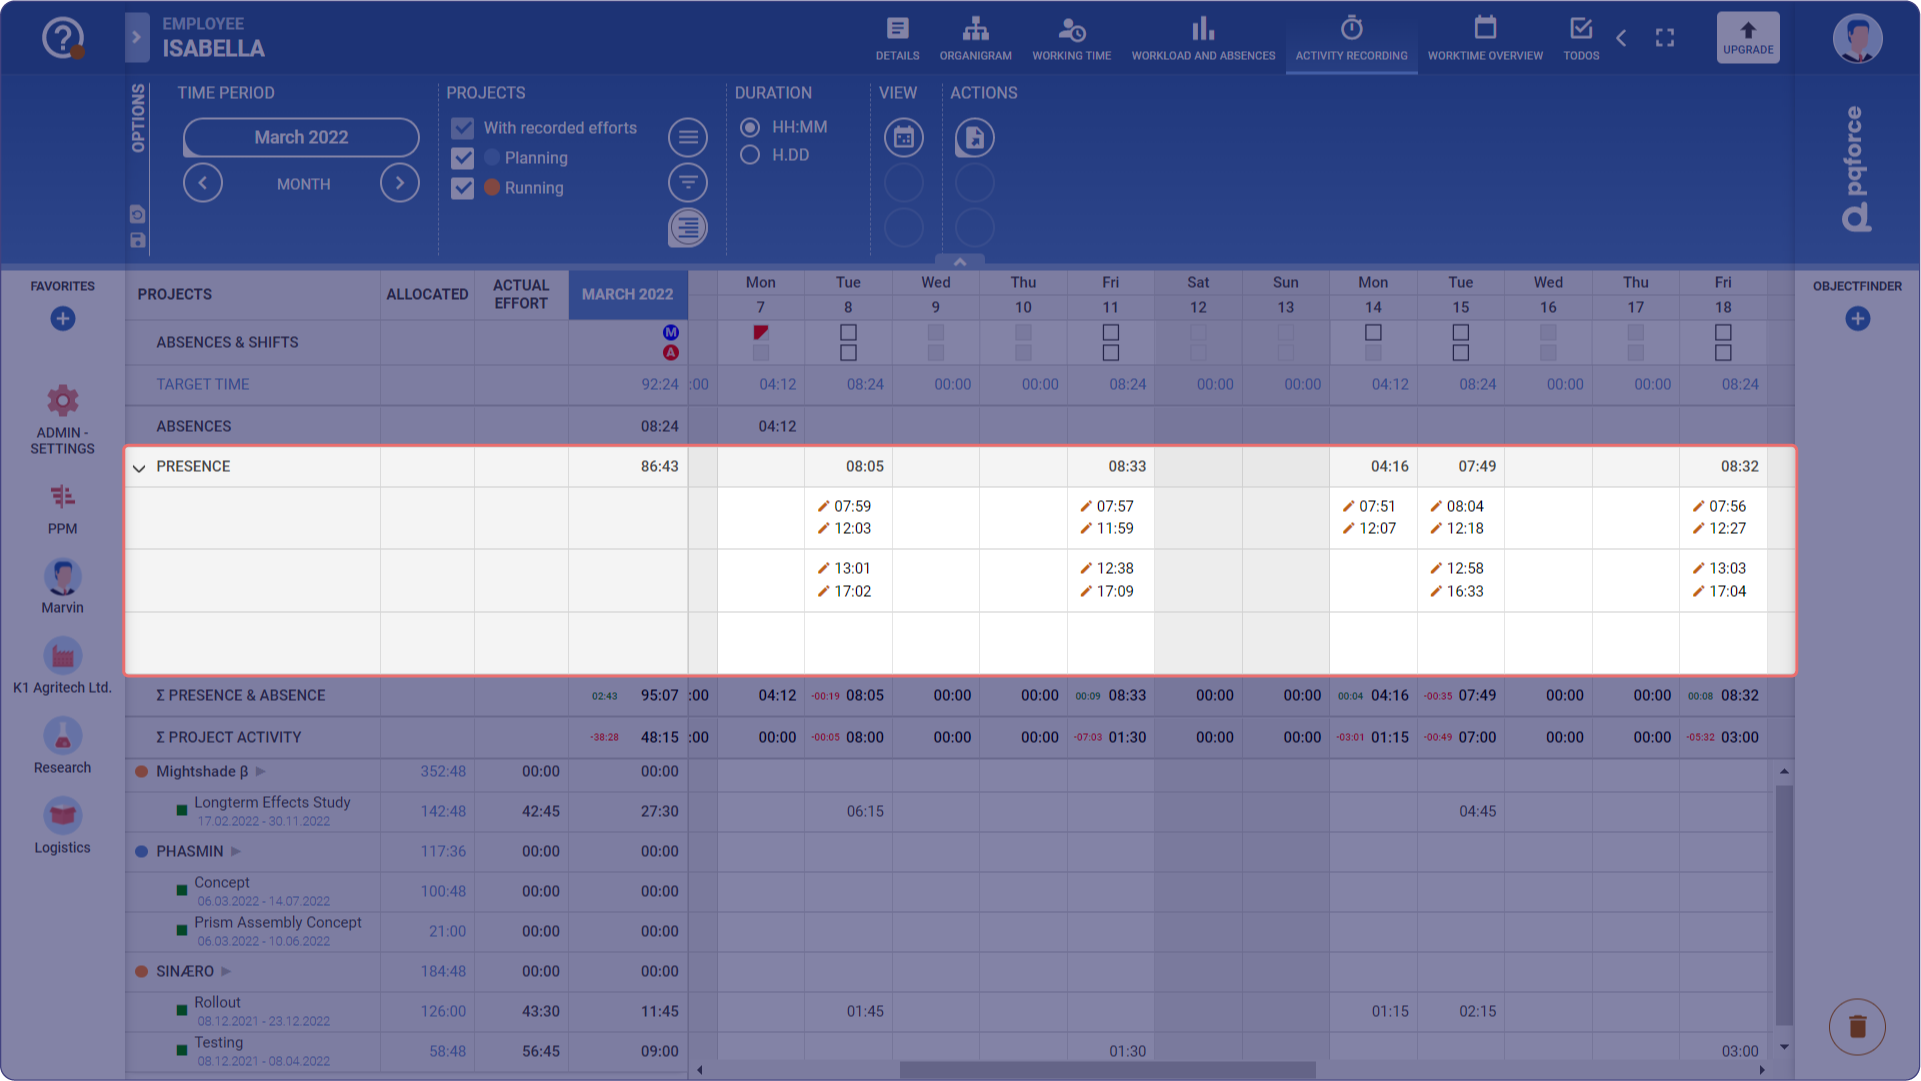
In PQFORCE, registering presence involves tracking and recording employees' presence for work within predefined time frames:
-
Clocking In: Employees begin their work shift by logging in to the system, indicating their presence.
-
Clocking Out: At the end of their shift, employees log out of the system, signifying the conclusion of their work period.
This feature enables to maintain precise records of employee attendance and absences, facilitating effective workforce management and productivity optimization.
PQFORCE offers two methods for employees to register the working presence:
Clock in/ Clock out:
-
Access the User Menu.
-
Within the menu, select Clock in to start registering the working presence.
-
To conclude the recording, select Clock out from the same menu.
-
This method allows for multiple registrations in a day, allowing for breaks and resuming work during the working day
Manually record presence:
-
Navigate to the Activity Recording view.
-
Within the table, select the desired date for which the working presence must be recorded.
-
Manually input the precise time slots indicating the start and end times of the working shift.
-
The system automatically calculates the total hours worked, based on the registered data for each day.
-
A pencil shaped icon
![]() will appear next to each time slot inserted manually
 will appear next to each time slot inserted manually
Recording absences:
-
Navigate to the Activity Recording view
-
Locate ABSENCES AND SHIFTS line within the table.
-
Click the box icon
![]() under a specific date.
 under a specific date.
-
In a pop-up window, select the reason for absence and leave a voluntary comment
-
Clicking OK to confirm the absence.
-
Selecting multiple boxes at once enables the entry of several identical absences with the same type and comment.
Recording project activity
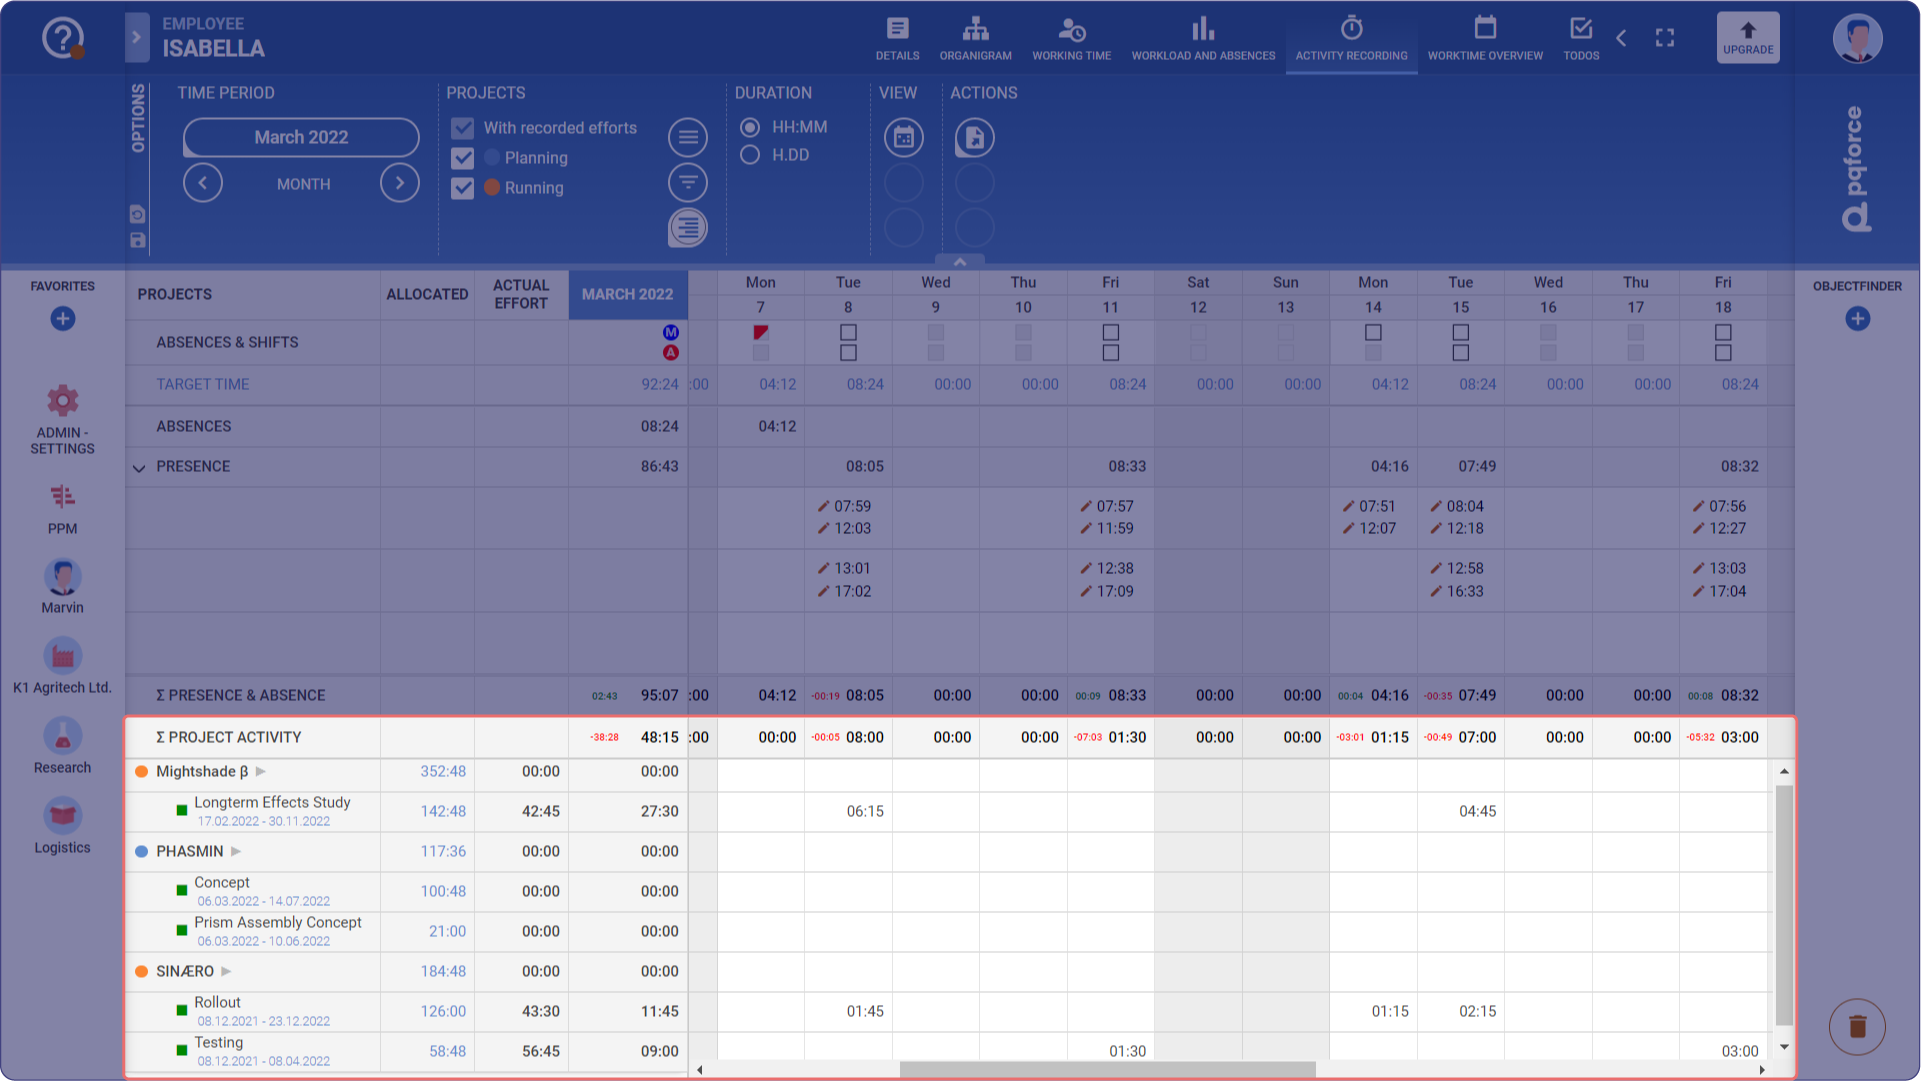
In PQFORCE, project activity recording allows employees to input the precise time slots for each activity assigned to them, indicating the number of hours or minutes spent on individual task and project.
It is possible to record the working activity by following these steps:
-
Access the Activity Recording view
-
Locate the date for which the activity needs to be recorded (this can be the current working day or any other day within the calendar).
-
From the list of available projects and tasks, locate the project to which the working hours will be allocated.
-
Input the precise number of hours worked under the selected date column and the corresponding project line.
-
If the total recorded time exceeds 24 hours, it will be highlighted in red. If it exceeds the allocated presence time, it will be shown in orange. In all other cases, the time will appear in black. If no presence has been recorded for the day, the system will instead display the expected presence time, which is shown in grey.