TODOs
In this view, TODOs are displayed and edited in a Kanban board or list. The displayed TODOs always refer to the active object. Depending on the object type, TODOs are also displayed that have a connection to a hierarchically lower or higher object.
Good to know
The following sections on TODOs are the same for the PPM and HRM modules. It has been included it in multiple places to ensure easy discoverability following the software structure. Regardless which module the view is located in, the workspace and its functions for managing TODOs remain consistent.
What are TODOs?
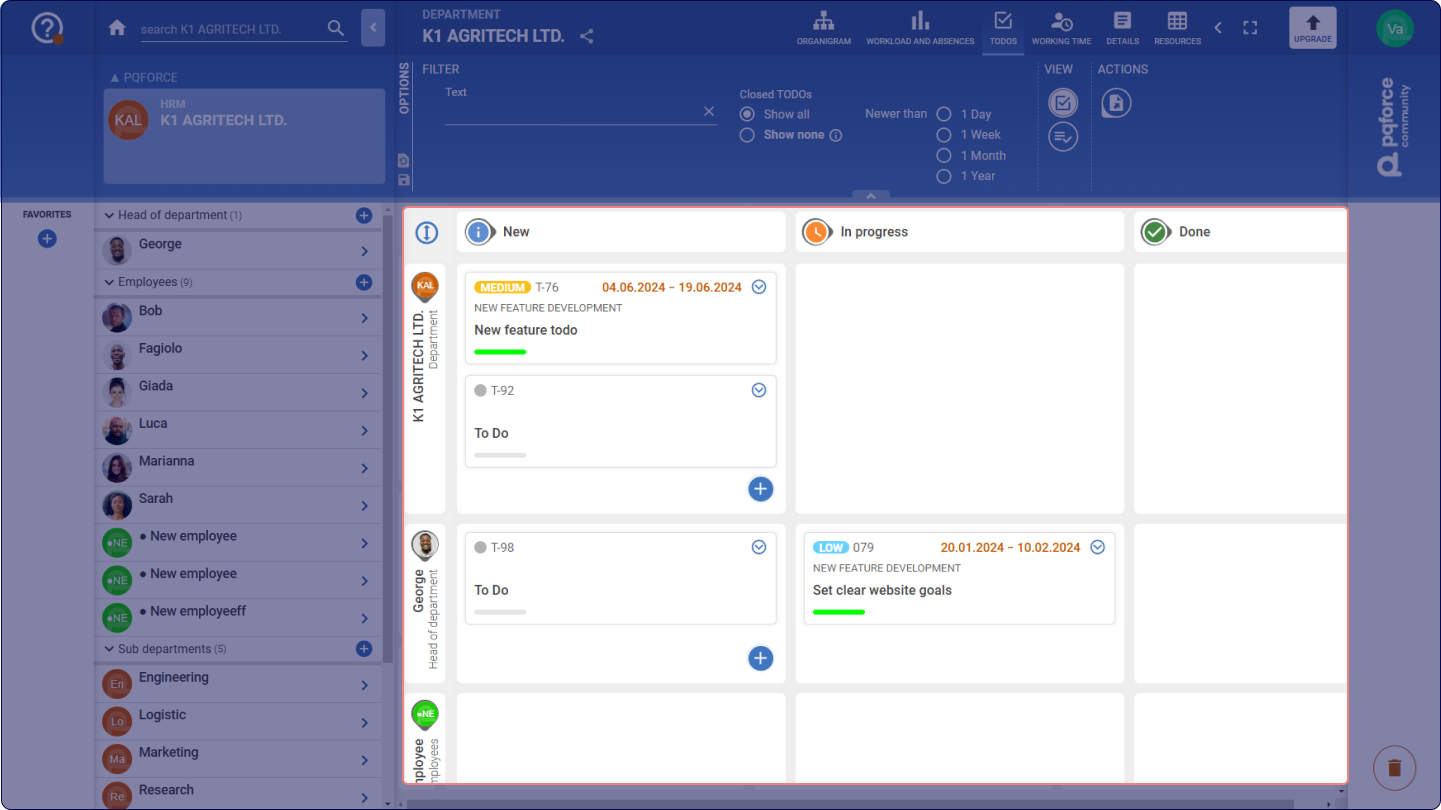
TODOs are objects that can be attached to one or more other objects in PQFORCE via relations. TODOs are used to map tasks that are handled within or outside of projects. In contrast to the tasks in the projects, no efforts can be allocated to TODOs and no activities can be recorded. Therefore, TODOs do not generate workloads.
These TODOs are particularly suitable for agile working in projects. They can represent the elements of a backlog, which can be attached to a task or milestone in planning.
Side Tab
Each TODO to which the logged-in employee has a relation to can be viewed and edited in the Side Tab. In particular, the TODO can be connected with other PQFORCE objects there. The upcoming section will cover the available choices and editing capabilities within the Side Tab.
TODO
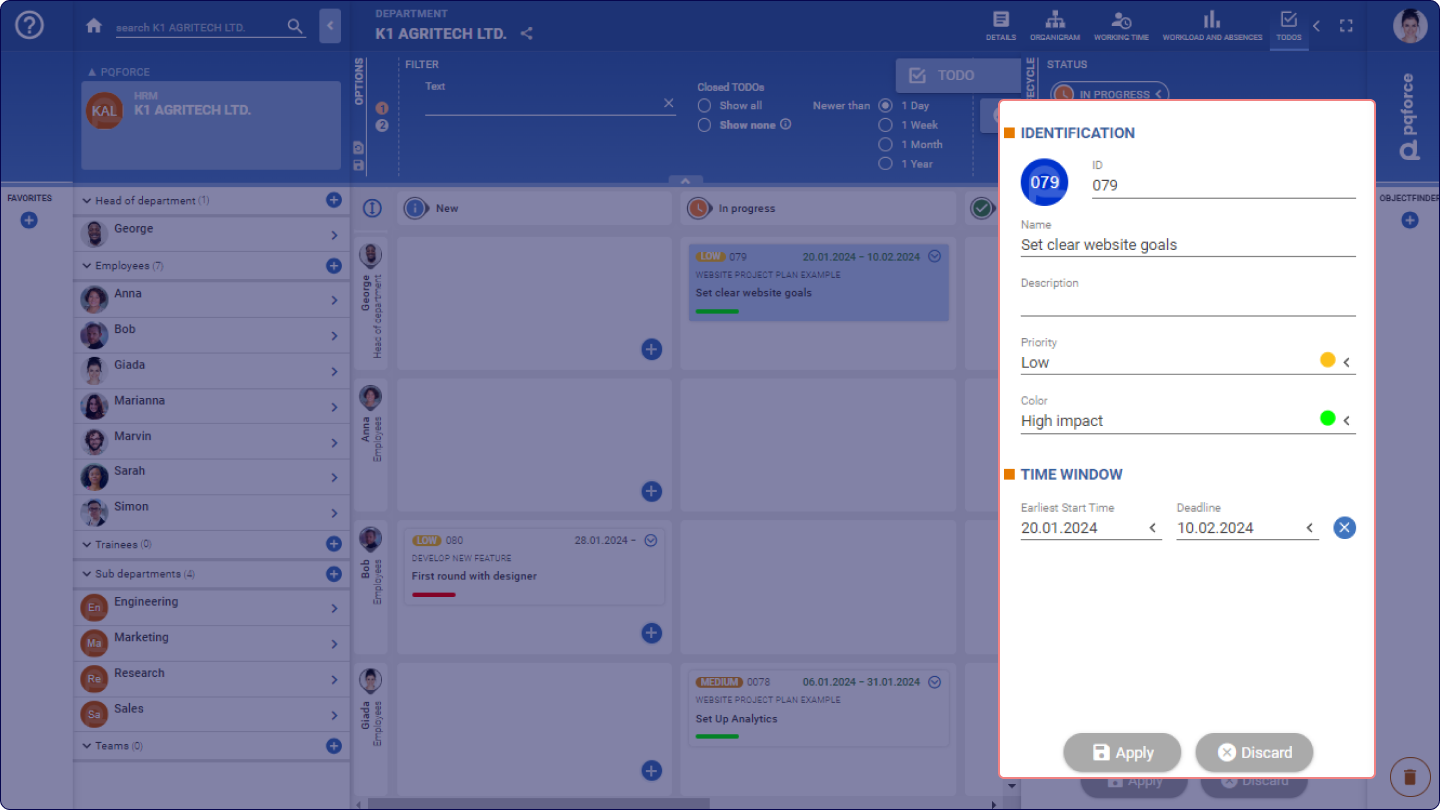
This tab corresponds to the DETAILS view of the TODO and contains its life cycle and the following general properties:
IDENTIFICATION: In this section the identification characteristics of the displayed TODO are entered.
- Image: The image serves as a visual identifier of the TODO. An image can simply be dropped here via drag & drop. Alternatively, an image can also be copied and then pasted here by clicking on the circle and then using CTRL+V.
- ID: The ID is a sequence of characters that serves as an identification feature of the TODO. Each assigned ID can only exist once on TODOs in the system.
- Name: The name of the TODOs is used to help distinguish each TODO.
- Description: The description is a rich text field and can therefore be used to enter any details and explanation for the TODO.
- Priority: TODOs can be defined with either a low, medium and high priority.
- Colour: The TODOs can be assigned a colour to differentiate and categorise the TODOs visually. The list of colours assigned to this selection field can be customised in the ADMIN module.
TIME WINDOW: The completion time frame of the TODOs can be set as follows:
- Earliest start time: Determines the date from which the TODO is to be processed by the assigned employee at the earliest.
- Deadline: Defines the date on which the assigned employee should have completed the TODO.
- If needed, the Discard Data button can be employed to remove the data set in this section.
Relations
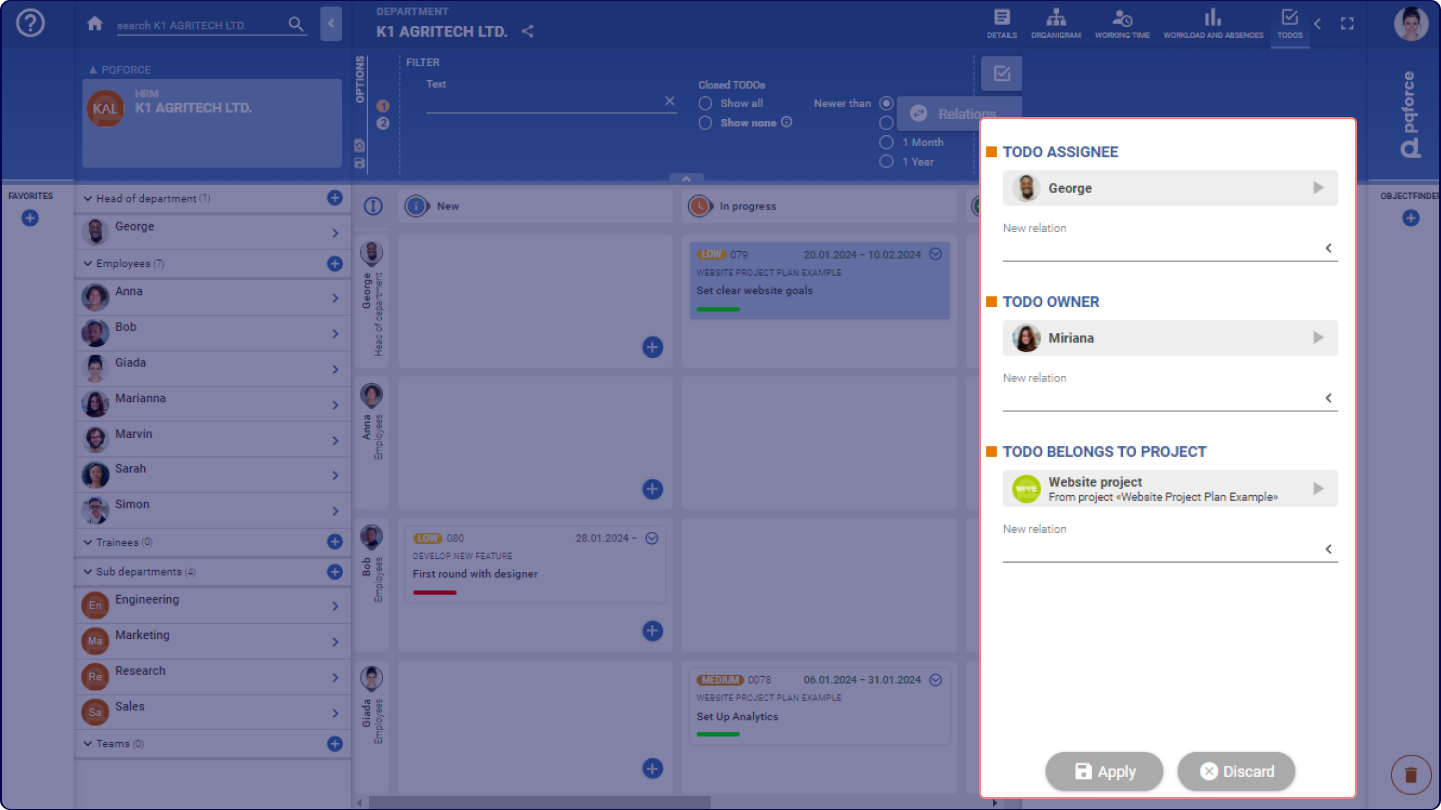
In this tab, the relations that link the TODO with other objects in PQFORCE can be viewed and maintained. For each relation, an object can be selected using the selection field, which is then linked to the TODO. Several relations of the same type can exist. An existing relation can be removed by dragging and dropping it onto the trash can.
The following paragraph explains all existing relation types between TODOs and other PQFORCE objects.
- TODO assigned to: This relation allows a TODO to be assigned to an employee or a department, making them responsible for processing it. The assignee can view and edit the TODO they are assigned to, as well as update its Lifecycle status.
- TODO owner: This relation allows an employee to manage the associated TODO fully. The owner can see, edit, and delete the TODO, as well as assign it to other employees. This includes the ability to change the Lifecycle status of the TODO.
- TODO belongs to a project: With this relation the TODO can be assigned to a project.
DOCUMENTS
In this tab, it is possible to attach documents and website links.
Uploading files
Files are available only for editions higher than PQFORCE Smart
By clicking the File button, a new file can be uploaded. A file can be deposited onto the Drop file here area via drag and drop. A description can also be provided.
Create links
By clicking on the button Website a new link can be created by entering a URL and optionally a description.
WORKSPACE
Whenever TODOs are accessible for viewing and editing, there are two distinct displays available:
- Kanban Board: This display is particularly suitable for grasping the status of various TODOs at a glance. The Kanban board enables efficient management of status and relations for TODOs through simple drag-and-drop actions.
- List View: The list view of TODOs offers options for filtering and sorting TODOs based on various attributes.
The following sections will explain in detail how to read and understand the TODO view and its two representations on the corresponding object types.
Kanban Board
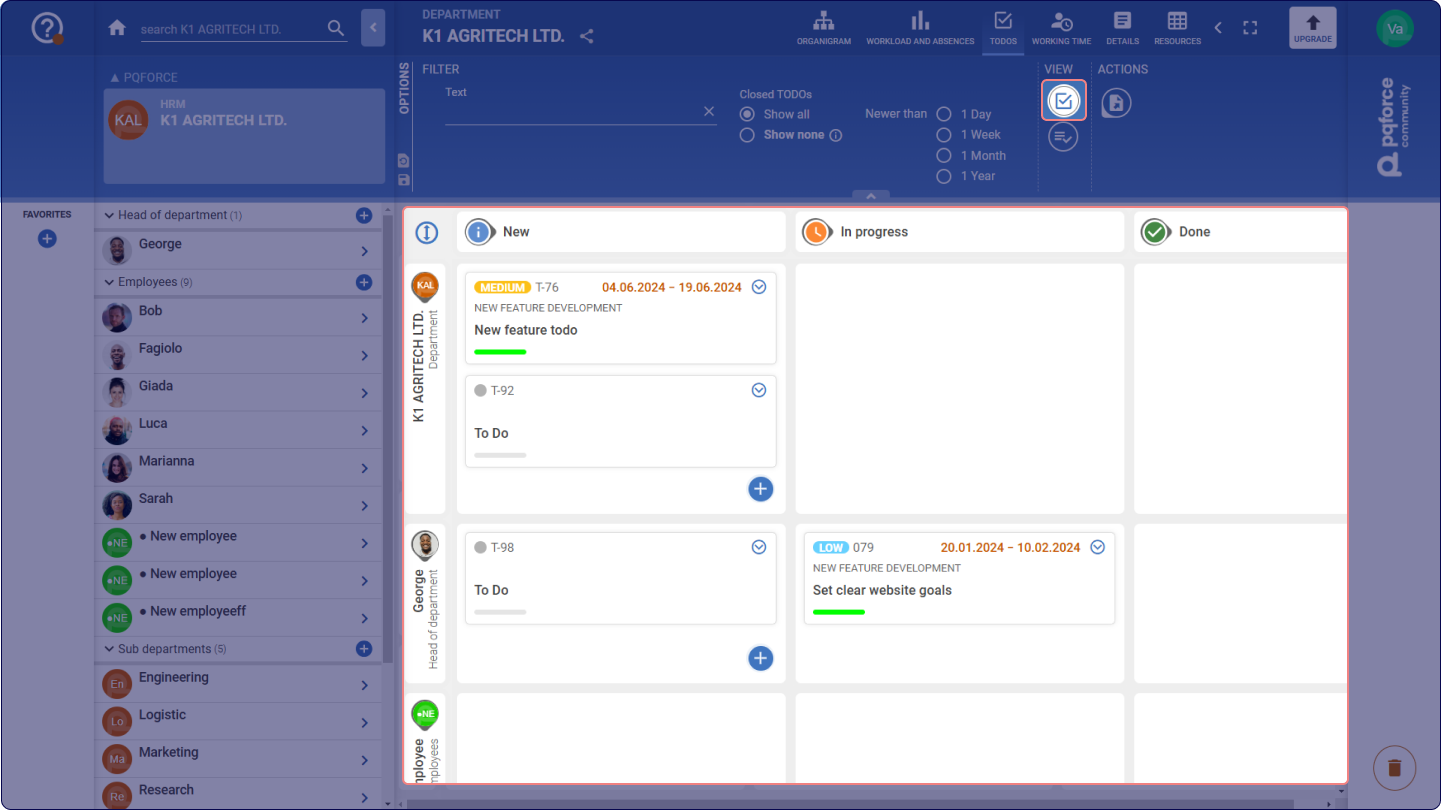
The Kanban board is organised as a table where TODOs are arranged. Its columns correspond to various Lifecycle statuses, and its rows align with the different relations that TODOs have with other objects in PQFORCE. The columns remain consistent throughout the system, but the rows vary depending on the object type under consideration. Below, we outline which rows are available for each object type:
- Project: A single row exists on the Kanban board for a project. In this row, you'll find all TODOs directly associated with the project, as well as those linked to tasks within the project if you flag the corresponding option.
- Task: For a task, there are two main rows on the Kanban board. One represents the specific task and lists all TODOs directly related to it. Additionally, a second row can be shown, listing all TODOs originating from subtasks of the considered task.
- Department: Within a department, there's one row on the Kanban board for the department itself. Additional rows are allocated for each employee and subdepartment contained within the department.
- Employee: An employee's Kanban board comprises two rows. The first displays all TODOs assigned to the employee, while the second lists all TODOs owned by the employee.
Create TODOs in the Kanban Board
In the first column labeled New status, a new TODO can be created within each row by clicking on the Plus button  . This will directly link the TODO to the object associated with that row. The creating employee is immediately designated as the owner of the TODO.
Edit TODOs in the Kanban Board
1 On the top-right, the TODO can be expanded using the Arrow button  . This action reveals the description and the most recent comment of the TODO will be displayed in the expanded area.
2 At the bottom, the Lifecycle history of the TODO can be displayed and a comment can be entered.
Moving TODOs in the Kanban Board
TODOs can be moved in the Kanban board using drag & drop.
If a TODO is moved to another column, its previous Lifecycle status will be updated with the new one. As usual, a comment can be entered.
If a TODO is moved to another row, the original relation is removed and the corresponding new relation is assigned.
Copying TODOs in the Kanban Board
A TODO can be copied in the Kanban board using drag & drop by dragging it onto the Plus button . It can be selected whether only one or several copies are to be created. A TODO can also be copied to another row than the one in which it is currently located.
Deleting TODOs in the Kanban Board
A TODO can be deleted from the Kanban board by dragging and dropping it into the trash can at the bottom right. Subsequently, it must be selected in the appearing context menu whether the entire TODO is to be deleted or only the relation from whose corresponding line the TODO was removed. If only the relation is deleted, the TODO remains, provided that another relation to the TODO exists.
Editing multiple TODOs simultaneously in the Kanban board
Moving/Copying/Deleting can also be executed for several TODOs at the same time. For this, the desired TODOs must be selected at the same time. This can be done by clicking on one or more TODOs after selecting a TODO with the CTRL key held down. If an already selected TODO is clicked with the CTRL key held down, it will be removed from the selection again.
Alternatively, multiple TODOs can be selected by clicking on another TODO after selecting a TODO while holding down the SHIFT key, which adds this TODO and all TODOs in between to the selection.
If several TODOs are selected at the same time, they can be moved, copied or deleted exactly as described above.
Close and open rows and columns
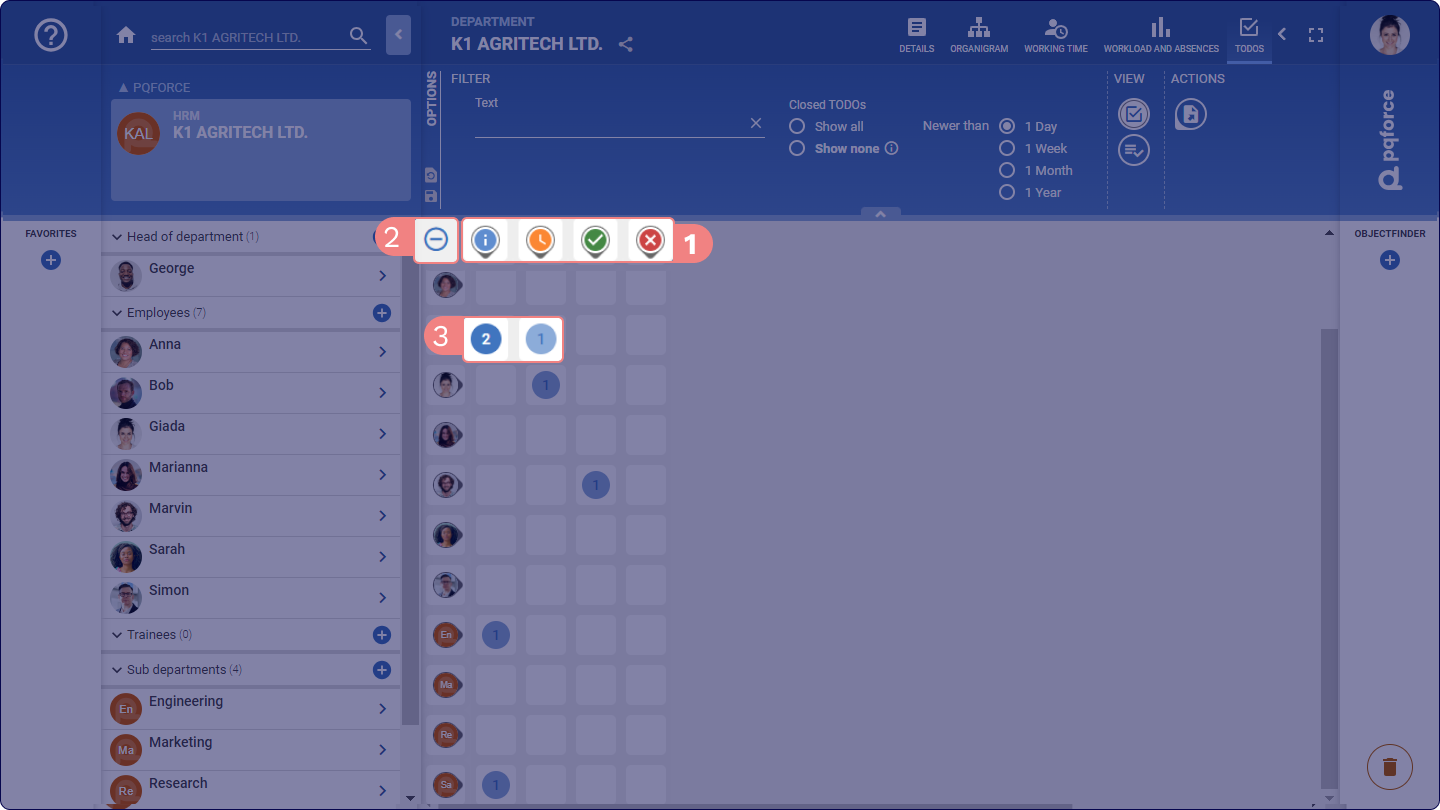
1 Clicking the icon  next to a row or column title will close or open the corresponding row or column.
2 The button at the top left can be used to close or open all rows and columns simultaneously.
3 The numbers in closed rows or columns noted how many hidden TODOs are there. Clicking on this number opens the associated row and column.
List View
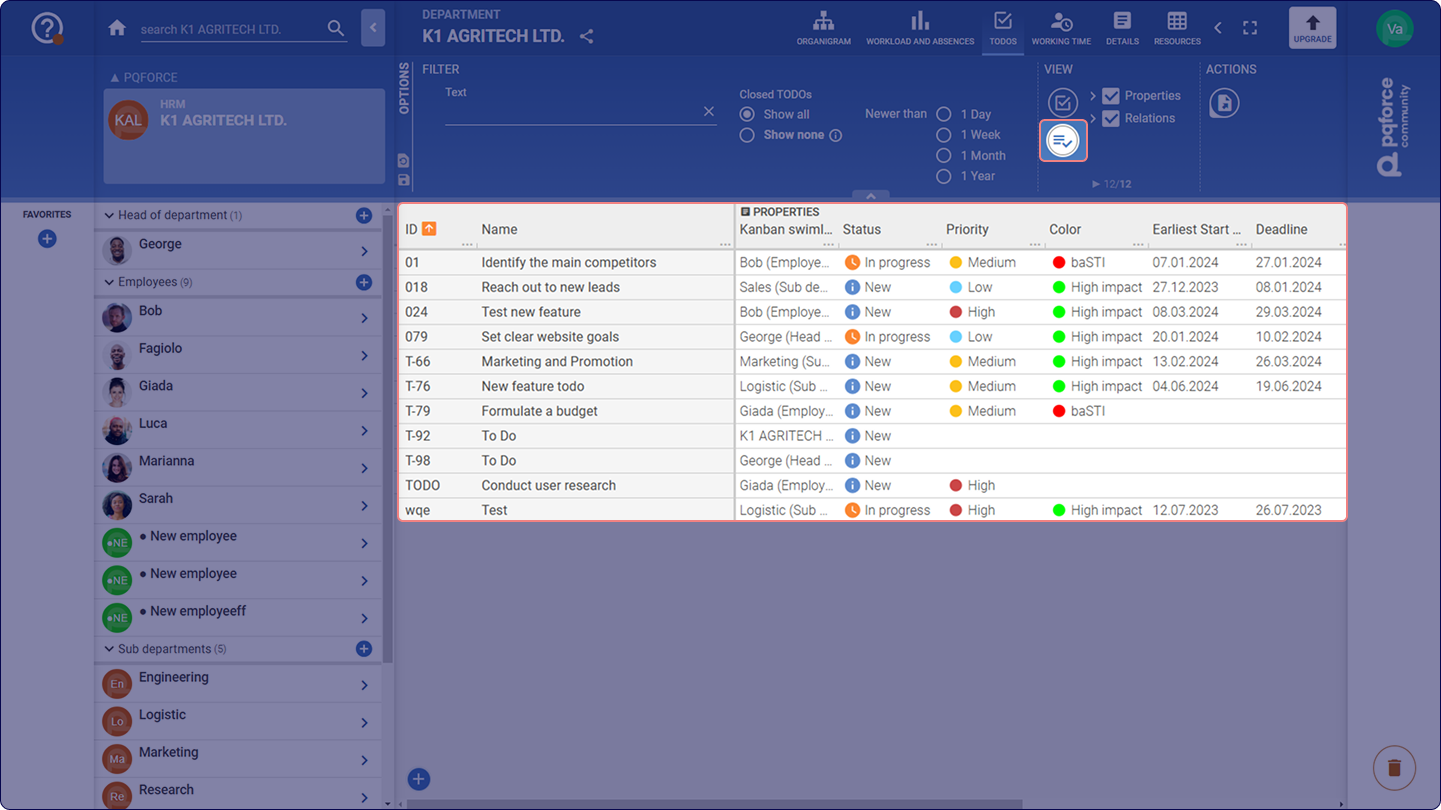
This view offers a customizable listing of all TODOs that have a relation to the active object. In the workspace, this view contains a table in which the TODOs are listed as rows and properties of these TODOs are listed as columns. The information displayed depends on the settings made in the Options Area. The settings determine on the one hand which TODOs are displayed and on the other hand which properties are displayed as columns in the table in the workspace.
Column filtering

With the help of each column in the table, the display in the workspace can be refined by sorting or filtering according to information in said column.
By clicking on the heading of a column, the TODOs are sorted in ascending order according to the information in that column. Clicking again will sort in descending order. A third click activates the grouping mode, in which the TODOs are divided into groups where all TODOs in a group share the same value in the relevant column. Clicking once more switches back to ascending sorting.
1 By clicking on the three small dots next to the heading of a column, a filter can be set for the corresponding column. All values that are available in this column are displayed and the values that are to be filtered can be selected or deselected. By clicking on ALL, all values are selected. By clicking on NONE all values will be deselected. Clicking on RESET will restore the selection that was set before opening the filter.
Filter settings can be made in several columns at the same time to limit the selection of TODOs as specifically as possible.
2 Clicking the icon by the ID column header will disable all filters.
Creating TODOs in the List View
At the bottom left of the workspace, a new TODO can be created with the Plus button . The creating employee will be declared as the owner of the TODO.
Copying TODOs in the List View
A TODO can be copied in the list view using drag & drop by dragging it onto the Plus button . It can be selected whether only one or several copies are to be created.
Deleting TODOs in the List view
A TODO can be deleted from the list view by dragging and dropping it onto the Trash Bin at the bottom right. Note that TODOs are always deleted from the list view, regardless of whether there are other relations besides the one to the active object.
Editing multiple TODOs simultaneously in the list view
TODOs with the CTRL key pressed after selecting a TODO, which adds them to the selection. If an already selected TODO is clicked with the CTRL key held down, it will be removed from the selection again.
Alternatively, multiple TODOs can be selected by clicking on another TODO after selecting a TODO while holding down the SHIFT key, which adds this TODO and all TODOs in between to the selection.
If several TODOs are selected at the same time, they can be copied or deleted exactly as described above.
Options Area
This section provides a detailed description of the settings available in the Options Area.
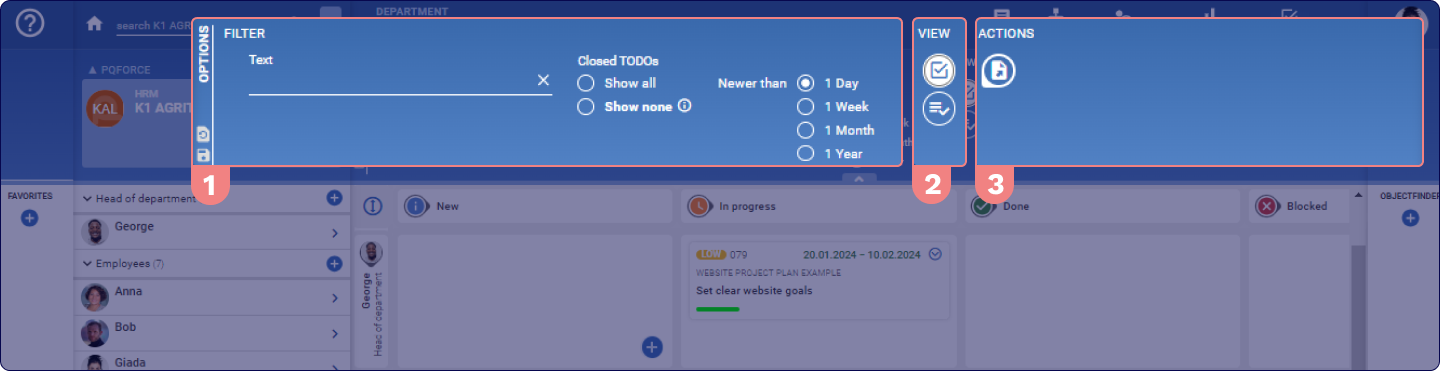
FILTER
The filter settings restrict the selection of TODOs displayed in the workspace. This can be achieved using the following options.
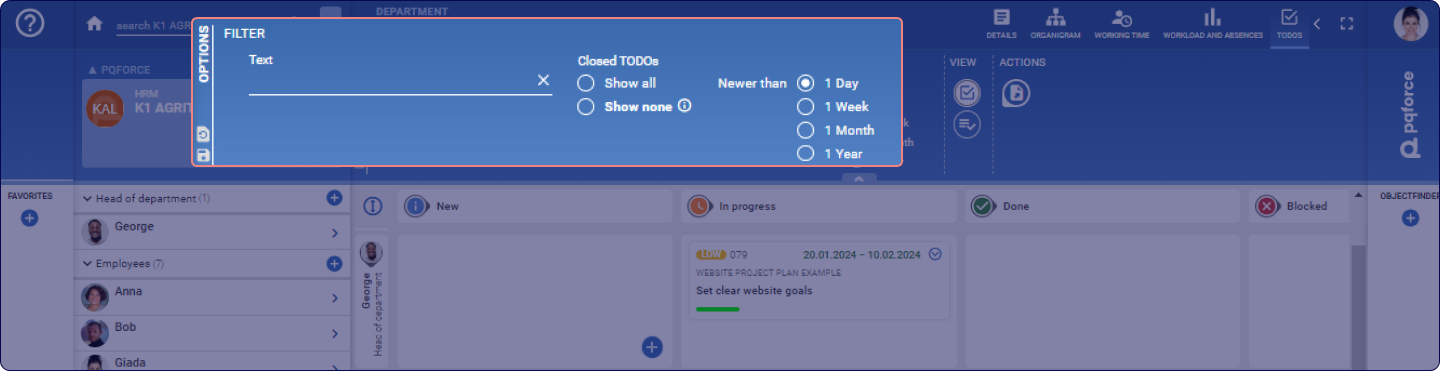
- Text: This filter permits the free entry of text, subsequently hiding TODOs that lack this text in their IDENTIFICATION fields (ID, Name, Description, colour).
- Closed TODOs: This filter changes whether and which completed TODOs are displayed in the workspace. The following options are available:
- Show All: Displays all completed TODOs.
- Show None: Does not display any completed TODOs. This can increase performance, especially if there are a lot of completed TODOs in the system.
- Newer than 1 day / 1 week / 1 month / 1 year: Displays only the completed TODOs that have been transferred to the Completed status within the last day / week / month / year. All older TODOs are hidden.
VIEW
In this section, adjustments can be made to expand or modify the active view.
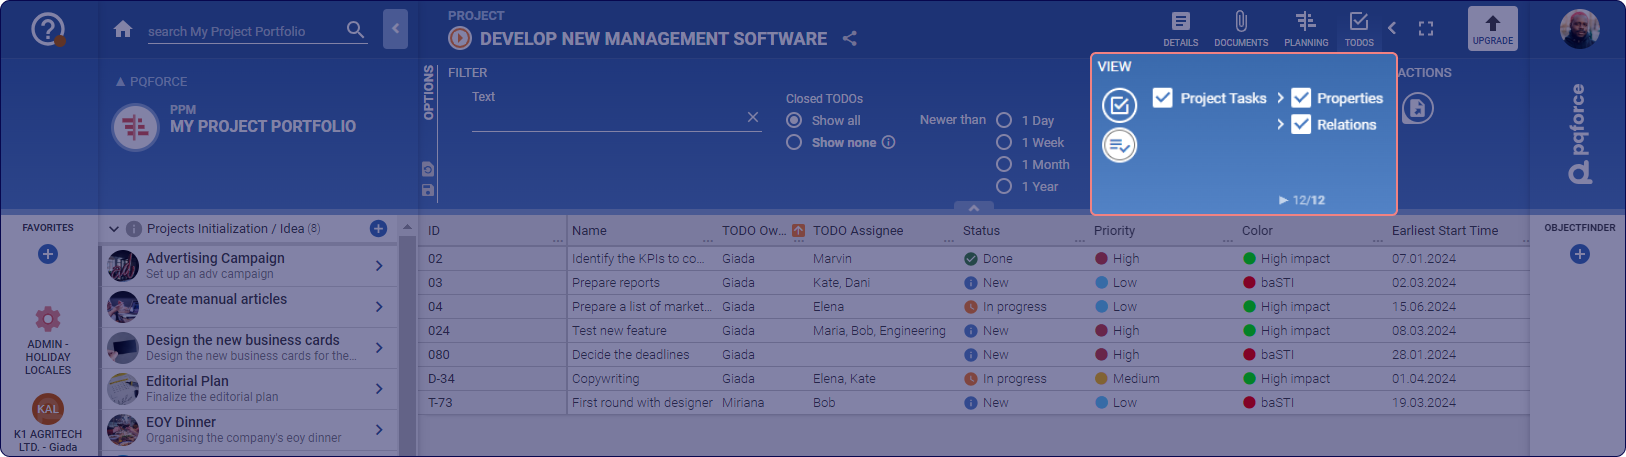
- Display Kanban view: Switches to the Kanban board described above in the workspace.
- Show List View: Switches to the list view described above in the workspace. If this view is active, check boxes appear to the right of this button, which can be used to select the columns displayed in the workspace. The following options are available:
- Properties: Contains attributes from the TODO tab in the Side Tab for a TODO and for comments or markers.
- Relations: Contains the relations that a TODO can have to other objects in PQFORCE.
- Show project tasks or subtasks: When viewing the TODOs of a project, checking the project's task checkbox will display all the project tasks’ TODOs in a new swimlane. If the TODOs are shown in the secondary workspace of the Gantt view, this option is labeled as "show subtasks" and displays the TODOs associated with all the subtasks of the selected task.
ACTIONS
Actions for the active view can be performed here.
Export: Here, the table can be exported as currently displayed in the workspace.